
Thursday, June 23, 2011
Make a Flag Cake, Make a Flag Cake!
I can not believe it's almost the end of June. AND the July 4th weekend is next week! Last year, I made this totally awesome flag cake. Trust me, it's awesome. You should make one too! Seriously! It was a lot of fun to assemble AND everyone at your party will LOVE it. I promise! Click here for the HOW TO. Have fun :)
Saturday, June 18, 2011
Peach & Cheese Danish
It's summertime, and I get a lot of free fruits from people. I love it! But, a (good) problem I have is that I get so many that I can't finish. So, I make fun things like this danish. It was so good and easy for a Friday night. Easier because I used store-bought puff pastry.

Caramelize the peaches:
2 peaches sliced (I had white peaches)
3 tablespoons butter
1.5 tablespoons sugar
Preheat oven to 400 degrees. Melt the butter over low heat. Add sugar and peaches. Turn up heat slightly and cook peaches about 5 minutes or until caramelized.

Make cream cheese filling:
4 oz. light cream cheese (room temperature)
1/2 teaspoon vanilla extract
sugar (I don't remember how much I used, maybe 2 tablespoons)

Thaw the puff pastry according to the instructions on the box. Dunno why, but I had some problems separating the sheet (first time ever). So, I threw some flour on it and rolled it out. I cut them into 6 pieces (2 large pastries and 4 smaller pastries).


Top with the caramelized peaches:

Bake for about 20 minutes or until golden.

Let cool and enjoy with your favorite beverage.

Caramelize the peaches:
2 peaches sliced (I had white peaches)
3 tablespoons butter
1.5 tablespoons sugar
Preheat oven to 400 degrees. Melt the butter over low heat. Add sugar and peaches. Turn up heat slightly and cook peaches about 5 minutes or until caramelized.

Make cream cheese filling:
4 oz. light cream cheese (room temperature)
1/2 teaspoon vanilla extract
sugar (I don't remember how much I used, maybe 2 tablespoons)

Thaw the puff pastry according to the instructions on the box. Dunno why, but I had some problems separating the sheet (first time ever). So, I threw some flour on it and rolled it out. I cut them into 6 pieces (2 large pastries and 4 smaller pastries).

I formed the pastry shapes by pulling the edges up for the filling.


Bake for about 20 minutes or until golden.

Let cool and enjoy with your favorite beverage.
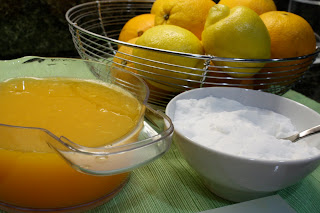
Too Many Oranges!
What do you do with lots and lots of free oranges? I've been given more oranges than I can eat or drink by myself. Luckily it's been warm here in the Bay, so I made some juice bars and orange sorbet.
For the juice bars, simply squeeze the juice and pour into your popsicle molds. Easy like nothing else.

Even after I made the juice bars, I still had a basketful of oranges left. I made orange sherbet. This too is very simple.

Recipe from the FoodNetwork.com here


Let your ice-cream maker do the work:


Transfer to a container, cover and freeze for a couple hours.

And, yes, I STILL have some oranges left...
For the juice bars, simply squeeze the juice and pour into your popsicle molds. Easy like nothing else.

Even after I made the juice bars, I still had a basketful of oranges left. I made orange sherbet. This too is very simple.


Let your ice-cream maker do the work:


Transfer to a container, cover and freeze for a couple hours.

And, yes, I STILL have some oranges left...
Japantown Farmers Market Veggies
Asparagus, zucchini and peas. Stir fried in garlic. So simple, so delicious!


Lemon Baked Salmon Salad

Dinner Friday was a baked salmon salad. It was so easy.
Preheat over to 350 degrees
Line small baking pan with foil. Place salmon filet in pan.
Squeeze the juice of half a lemon, sprinkle with salt and pepper.
Loosely wrap the salmon in foil.
Bake for about 15 minutes or until flakey.
That's it!
For the salad, I made a very simple, but delicious vinaigrette:
Lemon Honey Dijon Vinaigrette
- lemon juice of 1/2 a lemon
- extra virgin olive oil
- 1 tablespoon grainy mustard
- 1 tablespoon honey
- 1 clove minced garlic
- Salt & pepper to taste
Mix everything.

Monday, June 13, 2011
Cube Dog


And he even gets along with my cat, Angus. See them napping together on a cardboard box!

Watch this video for more info on the Cube Dog. Not only is he uber cute, I don't have to walk him, he doesn't smell and I can cuddle all day with my cats and play with him at the same time. Win!
There's a fun contest running this week, June 13-17, so be sure to visit Cube Dog on Facebook: facebook.com/cubedog. And go download the Cube Dog app and have fun!
This is a sponsored post by Cube Dog, but the opinions stated here are my own.
Sunday, June 12, 2011
Hazelnut & Chocolate Cupcakes

Recipe and instructions from The Hummingbird Bakery Cookbook
3/4 + 1 tablespoon all-purpose flour
2 1/2 tablespoons unsweetened cocoa powder
1 scant 3/4 cup sugar
1 1/2 teaspoon baking powder
a pinch of salt
3 tablespoons butter (room temperature)
1 egg
1/2 hazelnut and chocolate spread (aka Nutella)
shelled hazelnuts (optional for decorating)
hazelnut & chocolate frosting
2 cups confectioner's sugar
5 tablespoons unsalted butter (room temperature)
2 tablespoons whole milk
1/3 cup hazelnut and chocolate spread (aka Nutella)
Make batter:

1. Preheat oven to 350 degrees. Add flour, cocoa powder, baking powder, salt and butter in mixer and beat on slow until you get a sandy consistency.

2. Slowly pour the milk into the flour mixture, beating well until the ingredients are well mixed. Add the egg and beat well (scrap any unmixed ingredients from the side of bowl).

3. Spoon the batter into lined cupcake pan. Bake for 20 minutes, or until the cake bounces back when touched. Let the cupcakes cool slightly in the pan before placing on wire rack to cool completely.

4. When the cupcakes are cold, hollow out a small section in the center of each one and fill with a dollop of hazelnut and chocolate spread.

For the hazelnut and chocolate frosting:

1. Beat the confectioner's sugar and butter together in a mixer on med-slow speed until the mixture comes together and is well mixed. Turn the mixer down to a slower speed. Slowly pour in the milk, then when it is all incorporated, turn the mixer up to a high speed. Continue beating until the frosting is light and fluffy (at least 5 minutes). The longer the frosting is beaten, the fluffier and lighter it becomes.

2. Stir in the hazelnut and chocolate spread by hand until evenly mixed into the frosting.

3. Spoon frosting on top of cupcakes and decorate with hazelnuts (I used a piping bag and pink sprinkles).


2 1/2 tablespoons unsweetened cocoa powder
1 scant 3/4 cup sugar
1 1/2 teaspoon baking powder
a pinch of salt
3 tablespoons butter (room temperature)
1 egg
1/2 hazelnut and chocolate spread (aka Nutella)
shelled hazelnuts (optional for decorating)
hazelnut & chocolate frosting
2 cups confectioner's sugar
5 tablespoons unsalted butter (room temperature)
2 tablespoons whole milk
1/3 cup hazelnut and chocolate spread (aka Nutella)
Make batter:

1. Preheat oven to 350 degrees. Add flour, cocoa powder, baking powder, salt and butter in mixer and beat on slow until you get a sandy consistency.

2. Slowly pour the milk into the flour mixture, beating well until the ingredients are well mixed. Add the egg and beat well (scrap any unmixed ingredients from the side of bowl).

3. Spoon the batter into lined cupcake pan. Bake for 20 minutes, or until the cake bounces back when touched. Let the cupcakes cool slightly in the pan before placing on wire rack to cool completely.


4. When the cupcakes are cold, hollow out a small section in the center of each one and fill with a dollop of hazelnut and chocolate spread.

For the hazelnut and chocolate frosting:

1. Beat the confectioner's sugar and butter together in a mixer on med-slow speed until the mixture comes together and is well mixed. Turn the mixer down to a slower speed. Slowly pour in the milk, then when it is all incorporated, turn the mixer up to a high speed. Continue beating until the frosting is light and fluffy (at least 5 minutes). The longer the frosting is beaten, the fluffier and lighter it becomes.

2. Stir in the hazelnut and chocolate spread by hand until evenly mixed into the frosting.

3. Spoon frosting on top of cupcakes and decorate with hazelnuts (I used a piping bag and pink sprinkles).


Tuesday, June 7, 2011
Bison Burger, Anyone?
I know, it's been THREE months since I last blogged. I've been busy. AND I also lost the USB cable so I wasn't able to import photos from the camera. I still haven't found the cable, but I managed to import the photos because I am savvy... or rather found another USB from some other equipment we have...
I made bison burger awhile ago. Don't remember when, but J really liked it and it's supposed to be healthier than beef. We're always game to try healthy things as long as they don't taste bad. And the bison meat was a win.

I used the bison the same way I would any turkey or beef burger. I did add caramelized onions. It was cooked in marsala wine (I was trying to finish up my bottle of marsala wine). It was pretty delicious and really the only other thing different was the bison instead of beef.


The Easiest, Most Simple and Tastiest Chicken. Really.

My go-to roasted chicken recipe. It's so simple. So easy. And yes, so delicious. I'll marinate this around 5pm and it's ready to eat by dinnertime. All you need is about an hour to marinate it and an another hour to roast it. Ingredients are staples you most likely already have:
- Juice of 1 lemon
- Sprigs of rosemary
- Salt & Pepper
- Minced garlic
- Drizzle of Olive Oil

When you're ready to roast it, place everything into roasting pan. Roast in oven at 475 degrees (covered for 30 minutes. Uncover and continue to roast for another 30 minutes. The chicken will be brown, with crispy skin, and tender with juiciness inside. You don't even need ketchup!


When you're ready to roast it, place everything into roasting pan. Roast in oven at 475 degrees (covered for 30 minutes. Uncover and continue to roast for another 30 minutes. The chicken will be brown, with crispy skin, and tender with juiciness inside. You don't even need ketchup!

Fresh Squeezed Orange Juice
What do you do with lots of oranges? Make orange juice...


I promise! It's one of the best things


I promise! It's one of the best things
Easiest and Most Delicious Salad
I can eat this every day. And I pretty much do. Just a few simple ingredients and you can have this delicious salad:

- Olive Oil
- Balsamic Vinegar
- Salt
- Pepper
- Tomatoes (your favorite)
- Basil

- Olive Oil
- Balsamic Vinegar
- Salt
- Pepper
- Tomatoes (your favorite)
- Basil
Saturday, June 4, 2011
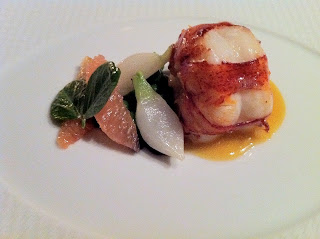
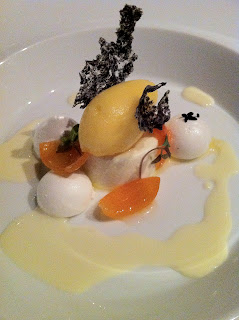
Thomas Keller's The French Laundry & Autograph
J & I landed a reservation at The French Laundry (after 3 years of trying). It was a last minute surprise for us because we found out we had the Sat. night reservation on the Tuesday night. We ended up spending beaucoup bucks, but hello, it's one of the top restaurants in the country, so we had to experience it. All the photos were taken on my phone, in dim restaurant lighting, so the quality isn't so great. But, at least you can see what you get from The French Laundry (we actually supplemented our dinner with additions because we wanted to try all Keller had to offer). Here are some photos of our meal:


 While waiting to be seated one of the restaurant guests requested Chef Keller sign her menu. I was like, that's a great idea! So I did the same before I left. I didn't really expect anything, but 2 weeks later, I received the autographed menu from that night. Nice touch, French Laundry!


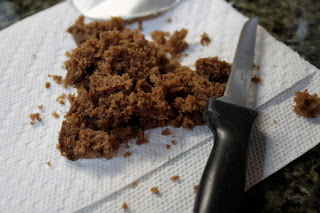
They sent us home with shortbread cookies. We enjoyed these at home, after our 1.5 hour drive from Yountville.

Subscribe to:
Posts (Atom)